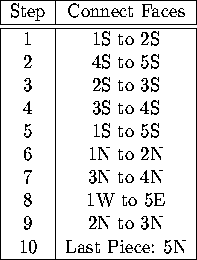
Table 2: Order of assembling the icosahedron faces.
With the colored sides face down, lay out the triangles so that they form the "net" as depicted in Figure 7. Each student should stand by the face (or faces) that he or she decorated. Using twist ties, the students should connect faces that are currently adjacent to each other. This will require 4 twist ties for most of the vertices, but only 2 and 1 twist ties for the vertices along the extreme "West" and "East" sides. At this point Stage 1 of the assembly is complete.
During Stage 2, the students will begin to fold the net upward. The structure will not be rigid until the very end, so those students who are not attaching faces should help to support the structure. The order in which the faces are connected is important, so during the second stage you may wish to remind the students not to connect faces out of sequence.
The faces should be connected as described in Table 2.

Table 2: Order of assembling the icosahedron faces.
About halfway through construction, you might want to ask the question, "how can we attach the very last face?" One way is to thread the twist ties so that you can twist them from the outside of the icosahedra.
If the side length of your icosahedron is large, you may need to periodically rotate the structure during construction so that students can crawl inside the structure to attach faces.
![[HOME]](/pix/home.gif) The Geometry Center Home Page
The Geometry Center Home Page
Author: Frederick J. Wicklin <fjw@geom.umn.edu>
Comments to:
webmaster@geom.umn.edu
Created: Summer 1994 ---
Last modified: Jul 21 1996
Copyright © 1994-1996 by
The Geometry Center
All rights reserved.