We already have most of the skills we need to start building the orbifolds of symmetric patterns. By the end of this lab, we'll be able to visualize the orbifold of any symmetric pattern, whether it be on the sphere, on the plane, or in hyperbolic space, and to completely classify the possible symmetric patterns on the sphere and the plane. (There are too many symmetric patterns on the hyperbolic plane for them to ever be classified.) We'll start by constructing examples of orbifolds of plane patterns.

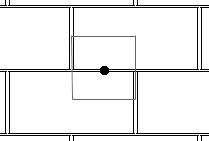
It has two kinds of mirror lines; one kind running vertically through the centers of some bricks, the other kind running horizontally through those centers. If we look at a smallest region enclosed by lines of mirror symmetry, we see that it is a rectangle containing two quarter bricks and a zig zag of mortar; let's use the lower left hand corner of one brick and the adjacent upper right corner of another.

Remember, the circuit of lines of mirror symmetry surrounding this region (shown in gray) is called a mirror string. If the fly on the wall knows what this region looks like, it can figure out what the whole brick wall must look like. The region outside of the mirror string is made up of reflected copies of the region inside the mirror string. When we continue our study of the symmetries of the brick wall we can concentrate on just this region -- imagine that all the rest of the brick wall has been folded up into this little block.
Recall from the section on wallpaper patterns how to find the mirror string of a symmetry group. The mirror string for the standard brick wall has type *22. Our fly determined this by starting at the middle of the rectangle outlined by the mirror string and moving upward until he hit the horizontal mirror at the top. He then walked to the right along the mirror to the first 2-way kaleidoscopic point at the brick's center and continued clockwise around the mirror string to the next 2-way kaleidoscopic point. He turned right, but after going only halfway around the rectangle he reached a point exactly like the one where he hit the first mirror and had to stop. (If he hadn't stopped, he might have thought the mirror string had type *2222, but even though the rectangle has four corners, opposite corners are identical. There are only two types of kaleidoscopic point.)
We know that the entire brick wall pattern can be described by a small patch of it. The following discussion should help you visualize how this is done.
Exercise: Copy the brick wall pattern onto a transparency. Fold the pattern along a line of mirror symmetry. Notice that the pattern on the right side of the mirror line exactly lines up with the pattern on the left side. (This shouldn't be surprising -- that's how mirrors work.
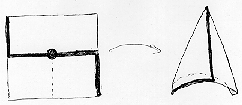
If we glue the two sides of the transparency together, we will have brought all the points on the left side of the mirror into permanent contact with their identical twins on the right side. Ideally, we'd like to describe the brick wall pattern by folding along all the mirror lines to end up with a little patch like the one shown above, but we are prevented from doing this by the thickness of the transparency and the inaccuracies in our drawing. With an ideal surface, like that of the sphere shown in Outside In, we could actually fold the brick wall pattern up like this. We don't have such an ideal surface, so we will content ourselves with cutting along the mirror lines with a pair of scissors. The result looks the same, but has a very different feel.
One might be foolish enough to believe that there is a 2-fold gyration point where the lines of mirror symmetry intersect. This is WRONG. Gyration points DON'T LIE ON MIRRORS! The brick wall does have rotational symmetry about the point where the mirrors intersect; this will appear as a corner on the boundary of the orbifold. Rotational symmetries that don't lie on mirror lines show up as cone points, which are different from corners.
 Exercise: Cut along the mirror string of the brick wall pattern
to form the small patch of brick wall shown above. Locate the
gyration point. Mark the gyration point with a pen, and cut a slit
from the mirror boundary of your brick wall patch to the gyration
point, (indicated by the dotted line in the illustration). Roll the
patch up into a cone shape, so that like points lie on top of each
other and tape your cone together. You've just constructed your first
orbifold model! Just as you "identified" points that were related by
mirror symmetry by folding your transparency, when you rolled up your
cone you identified points that were related by rotational symmetry.
What do you think would have happened if the gyration point had had
order four?
The symmetries and orbifold of the pattern are all described by the symbol 2*22; it has a gyration point of order two and a mirror string with two types of 2-way kaleidoscopic point. In the orbifold, the gyration point becomes a cone point -- the sharpness of the point is determined by the order of the rotational symmetry at that point. The two types of kaleidoscopic point become the two corner points on the mirror boundary.
Exercise: Start the program Kali and select the symmetry group 2*22. Choose "Show Singularities" from the Options menu. Use what you just learned to reproduce the brick wall pattern on the screen.
Our next topic is computation of orbifolds of spherical patterns (like the base triangles shown in Kali). If you're not yet comfortable with the methods used to compute plane patterns, you may wish to study a few more examples before moving on.
![[HOME]](/pix/home.gif) The Geometry Center Home Page
The Geometry Center Home Page
Author: Heidi Burgiel
Comments to:
webmaster@geom.umn.edu
Created: Dec 7 1995 ---
Last modified: Jul 31 1996
Copyright © 1995-1996 by
The Geometry Center
All rights reserved.